Friday, July 31, 2009

Products of my free time

In case you didn't know, the MAN took the kids away for a night on Tuesday, graciously leaving me home to craft away (for the whole debacle-ish story, click here). And while I wasn't nearly as productive as I had hoped, I did make a few new things. So here we go...
I started out by designing and cutting the pieces for a messenger bag from some small remnants I had in my stacks. Then I took notes in my newly reclaimed SEWING PROJECTS NOTEBOOK.
The next step was actually sewing the beast, and since I was making it specifically for my etsy shop, I was more than usually careful with my seams and corners. Which meant a lot of 0ne-on-one time with my seam ripper. But finally it was finished.

Here's a close up on the appliqued flower I added to the front flap. Looks cute, doesn't it, with the hand stitching?

The next day, I did some card making, going back to making collages with cut out paper. (Really, I don't think my mom let me play with paper dolls enough as a kid. I just love cutting out little dresses and skirts.)

And here's another one...

All of these items are going up for sale on my etsy shop today, so get 'em while they're hot!

Tuesday, July 28, 2009

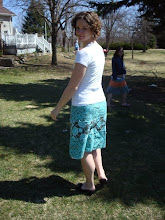
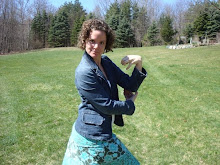
Here she is!

I started working yesterday morning, after cutting out the pieces and figuring and figuring and figuring how I wanted to set everything up. It was fun but challenging to create this without using a pattern. I've made purses without patterns, but never an article of clothing. But I figured making a skirt with an elastic waist was a good place to start--very forgiving.
I have a skirt from Gap with an elastic waist that is very full at the top, and I don't like how it bunches at my hips, so I decided to start narrower at the top and add fullness lower. Here are my initial measurements:
Layer 1: 11" x 45"
Layer 2: 7" x 90"
Layer 3: 2" x 135" (added just to break up the bottom two layers, which are both heavily patterned)
Layer 4: 7" x 135"


So here I am sewing on that narrow layer 3...


And this is how I gather: I sew a zigzag stitch over heavy embroidery thread, careful to keep the thread in the middle of the zigzags. Then I just pull on the embroidery thread at each end of the zigzagged edge to gather things up.


This is the finished product. I ended up making a few changes to the original design.
1) I had planned to add the velvet ribbon on the middle layer, but when I saw how bare the top layer looked, I added it there (and I have all that extra ribbon now!).
2) I ended up cutting 4" off the top layer (after sewing in the elastic, of course) because that layer just looked too long. (No pics of it--too much silliness)
3) Pockets! Clint thinks, though, that I should take one of them off. I kinda like the two, though, so I'm not sure.


It's very comfy, though, and cool. When I walk down the stairs in our house, it floats around me. Love that.

And look how twirly (yes, that is the boys having a light saber duel in the background). Guess I still am a bit of a little girl.

Saturday, July 25, 2009

New Skirt Coming Soon!

Check out the fabric I picked up today at Jo-Ann (they're having a sale: 30% off the Keepsake Calico selections). I want to try making a gathered skirt on this somewhat-cheaper fabric before I make one out of something more pricey.

I saw a little girls' skirt at the Plymouth Art Fair made by this designer, and I wanted one for myself! I'm a little too big to fit into her things, though, so I've been thinking ever since about making one for myself. Won't I be so cute? And pockets. Pockets are necessary...

Thursday, July 23, 2009

I have been thinking about adding some vinyl wall art to my living room. Have you heard of it? It's rather like a sticker or rub-on transfer. You attach it to your wall with a few steps (shown below) and when you tire of it (if ever!), you can simply peel it from the wall--leaving no residue.
But the problem is, our house was built sometime before 1900, and our walls are plaster--and very uneven and bumpy in spots. I didn't want to buy the art, try to attach it, and have it not adhere. I emailed Single Stone Studios and asked about how they thought it would work, and they emailed me a free sample! How nice.
I was thinking they might send a tiny letter or something, but instead, they sent this fabulous bird! She was very easy to apply, and she looks great. Here are the steps:
1: Make sure wall surface is dust free.
2: Burnish the wall art by rubbing mightily with a credit card (this makes it stick to the vinyl...)
3: Run a piece of tape along the top of the wall art (on the backside) to position it.


4: Flip the art up and remove the paper backing. Then flip it back down (carefully--it's really sticky) to the wall.

5: Rub the wall art again with the card (I just used my thumb, actually) to make it cling to the wall. You can lift the paper carefully if you're curious (like I am) and want to make sure it's sticking.


6: When the art is fully adhered to the wall, slowly peel the paper off and admire your wall art. If some of it didn't stick, smooth the paper back down and rub a little more.


Sit back and admire her!


I'm definitely going to be hitting Single Stone Studios up for a purchase soon. This bird was easy to apply (took MAYBE ten minutes total) and looks hand-painted. I'm thinking about painting my own little branch beneath her feet--but don't tell the MAN. He's not a big fan of painting on walls.

Wednesday, July 22, 2009

Shirt modifications

Here's my dilemma: I got this shirt last summer at my favorite store, and I like how it looks on the hanger, but when I put it on, it makes me look pregnant.


It came with a narrow belt made of the same fabric and loops maybe an inch above my natural waistline, but wearing the belt there just looks ridiculous on me, so I cut off the loops and tried wearing the belt here:


It wasn't very comfortable, though, and it still looked too blousy around my waist. I'm thinking of folding up the hem and making a casing, then running either narrow 1/4" elastic or the belt through it to make it have a different shape. Or maybe both the belt and the elastic?

I wish I knew how to do this:

Photo courtesy of A/Wear

Any ideas?

Sunday, July 19, 2009

Finding your craft

Photo from Giver's Log

My mom has told me that when she was in her twenties and thirties, she tried every craft available. She did latch-hook rugs, lampwicking, macrame, counted-cross stitch, and sewing. She learned how to knit, crochet, and decoupage. She has books on doll-making, jewelry-making, and card-making. You name the craft: she has tried it.
I know many other women like this. They walk up and down the aisles at J0-Ann, looking at all the options, picking up a package of brads here, sliding their fingers along the rainbow aisle of taffeta, picking up a craft book and flipping through the pages. And walking out of the store with empty hands.
Do you want to learn a craft? Are your itching fingers fighting a losing battle with your doubting heart? If so, maybe my blog will help. I will try to post a few times a week, sharing my craft projects, my ideas, my successes and failures.
And in the meantime, happy crafting.